This section is an introduction how to set up your new Tracker to your computer, how to position it and how to get started with a simple calibration example.
Remove the Tracker, the USB 3 cable and the Tripod from the sales box. Remove the protective film from the front glass of the Tracker. Assemble the Tracker and the tripod. Make sure the tripod and the Tracker are screwed tightly together so the tracker does not move. Insert the USB 3 cable in the Tracker itself and connect it to a USB 3.0 SuperSpeed port on your computer. Important: make sure your SW drivers for your USB 3.0 port are installed correctly, otherwise your tracker will not work.
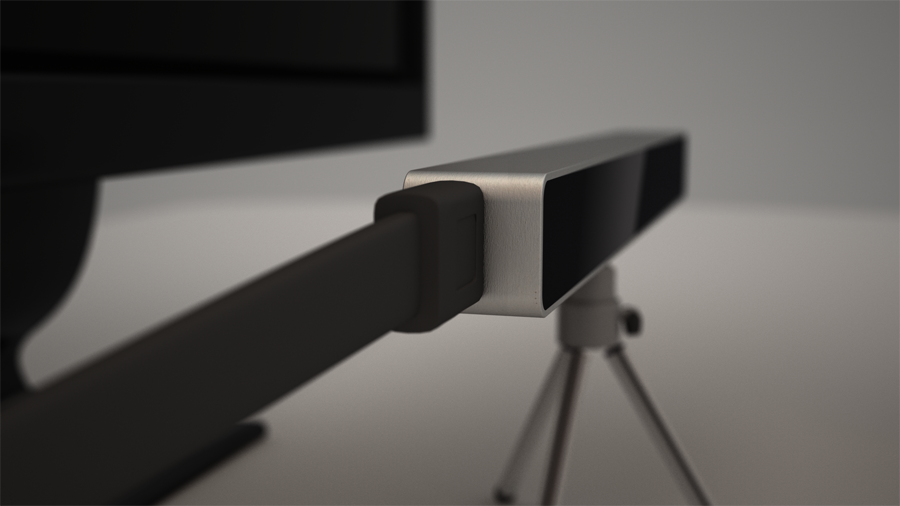
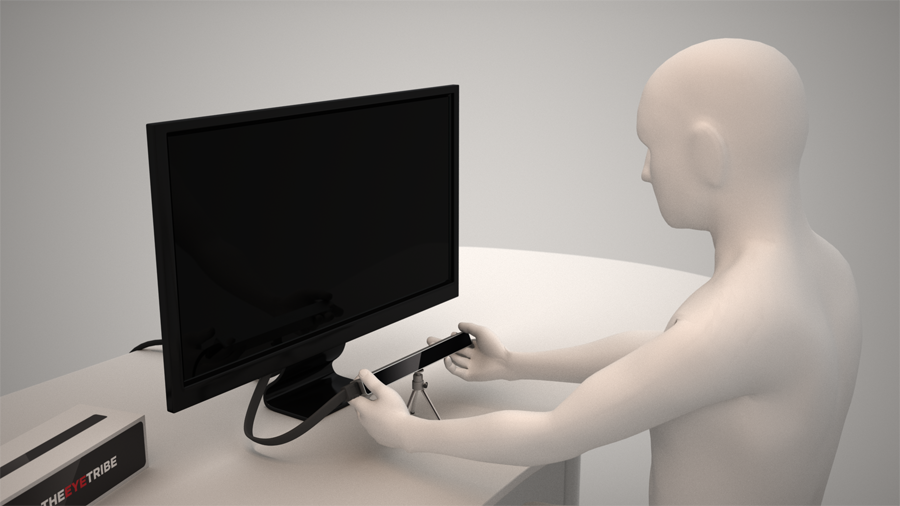
Position the Tracker mounted on the tripod on a flat horizontal surface below your monitor. It is important that the Tracker is centered relative to the monitor. The monitor must be max 24”. Note the Tracker should not be positioned above or next to the monitor as the tracking will not function optimally. Also it is important that the Tracker is placed so that it does not move during operation as this will destroy the tracking.
Download the Tracker SW from theeyetribe.com using your login from when your purchased the device. Launch the application and install the SW. Start the Tracker Server. Do not close the application as the Tracker Server is needed for the eye tracking to work.

Position yourself centered in front of the monitor at a distance of 45 - 75 cm. Angle the Tracker to point at your face using the tripod. Double click the EyeTribe UI icon on your desktop, or under C:\Program Files (x86)\EyeTribe\
Use the sample eyes to position yourself accurately. A green color indicates the right positioning. Once you are in the right position you can proceed to calibration. Follow the instructions on the screen to complete the calibration. Do not move your head during the calibration. Once the calibration is successful you get an indication of the quality of the calibration (1 to 5 stars). The higher the calibration ranking the higher precision of the eye tracking you can expect. Now you are ready to use the Tracker and it will provide gaze estimation coordinates to your own applications.
When you download and install the EyeTribe SDK, EyeTribe Server and EyeTribe UI are installed on your computer. This tutorial serves as a starting point to get you started with the EyeTribe UI for Windows.
EyeTribe UI application is started either from the icon on the desktop or from the TheEyeTribe folder located in your start menu inside All Programs. The software is by default installed in C:\Program Files (x86)\EyeTribe\. In this folder you will find two sub folders, Client and Server.
The EyeTribe UI will automatically attempt to start the Server if it is not running already. The autostart requires you to be administrator of your system, otherwise you need to start the Server manually by double clicking the black EyeTribe Server icon. The icons for EyeTribe UI and EyeTribe Server are depicted in the images below.
Figure: EyeTribe UI (white) and EyeTribe Server (black) icons.
The EyeTribe UI provides a direct feedback of the current tracking state and allows you to change the default settings to accommodate your needs. The main window is depicted in the image below. All changes in EyeTribe UI are automatically stored when you close the application and will be reloaded next time you start it.
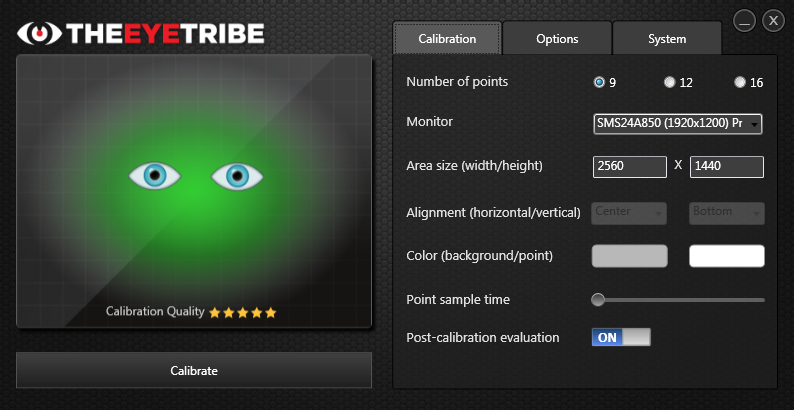
Figure: screenshot of EyeTribe UI user interface.
The demonstrator is your first encounter with EyeTribe UI and will take you through the most important steps in setting up the Tracker, placing yourself in the optimal position and guiding you through your first calibration. You can navigate by clicking the left and right arrow buttons on the display or the left and right keys on your keyboard. The demonstration mode can be skipped by pressing the Escape key. The EyeTribe UI will continue to start in demonstration mode until you deactivate this feature either by unchecking the Show at startup on the first page in the demonstration mode or by unchecking Start in demo mode found under the Options tab in the EyeTribe UI. A screenshot of the first step in the demonstration mode can be seen in the image below.
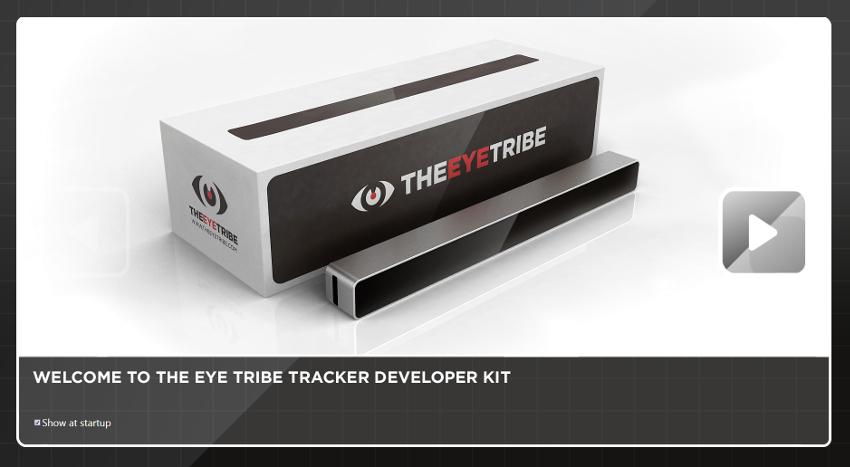
Figure: the demonstration mode is your first encounter with the EyeTribe UI. The guide will take you through the basics of the SDK and your first calibration.
On the left-hand side of the EyeTribe UI you find the trackbox window. The trackbox is a graphical representation of your position relative to the Tracker, and therefore it serves as a guide to determine whether you are within the tracking range of the system. Also, it is helpful to verify if the tracking is functional by providing a continuous feedback on the current tracking quality. It is important that you center align the Tracker under your monitor and orient it towards your face for optimal trackability.
All trackable eye movements are reflected in the trackbox. This is done by showing zero, one or two eyes in the trackbox, dependent on the tracking quality. If the tracking quality is acceptable both of your eyes appear inside the trackbox reflect your physical movements in real time. Moreover, changes in the background color are used to indicate the current tracking quality. In case of non-optimal tracing, the eyes may flicker.
The image sequence below shows a series of different states that can be shown by the trackbox. The different cases extends to good tracking, limited tracking, no/bad tracking and an error message, respectively.

Figure: Four cases of tracking that show good, limited, bad tracking and an error message.
When you see a full green background image and two eyes in the trackbox you are positioned correctly and tracking is good. If the background shimmers between red and green tracking is poor and you should try to reposition yourself or the device. No/bad tracking window is indicated by a red background plus a red not accessible symbol. When the no/bad tracking window appears the system is functional but the EyeTribe Server cannot find your eyes. Error messages can, as shown in the example, be a warning about missing connectivity to the Eye Tribe Tracker. Other warnings from the system are also communicated through the trackbox window (refer to Error Messages section below). For optimal tracking experience, try to maintain the position of your eyes in the center of the trackbox. This may require you to readjust the Tracker but it is important that you sit as comfortable as possible. If you move the Tracker after calibrating or you sit at a different position you may need to perform a re-calibration.
The tracbox section is your guide to see if the system is functional. Essentially, it continuously shows the current health state of the Eye Tribe Tracker. If an error is detected by the system the message is printed in the trackbox’s window. Currently, the error messages printed in the trackbox expand to the messages shown in the table below:
| Tracker Error Message | Description |
|---|---|
| Device not connected | The tracker is not detected. Connect or, disconnect and re connect, your tracker. |
| Device connected to a USB2.0 port | The tracker is detected but it is not working due to unsupported USB host. Download and install supported drivers for your USB3 manufacturer and try again. |
| A firmware updated is required | The tracker is detected but it is not working due to wrong/unsupported firmware. |
| No data coming out of the sensor | The tracker is detected but cannot receive any stream of data. |
Directly below the trackbox you find the calibrate button. When you click the Calibrate button you will taken through a calibration process. The process requires you to look at a series of calibration targets distributed evenly throughout the screen. Each target will appear one-by-one and they are visible for a predefined time period. The process usually takes about 20 seconds to complete. For more information about the calibration process, refer to Calibration section under each specific language.
A calibration can be aborted either by pressing the Escape key or by double click or double tab on the calibration area with a mouse or touch interface. The properties of the calibration can be changed under the Calibration tab.
The evaluation window is presented immediately after a completed calibration and provides an indication of the quality of the calibration (see image below). This is done by presenting a series of gaze-sensitive targets that react when looked upon.
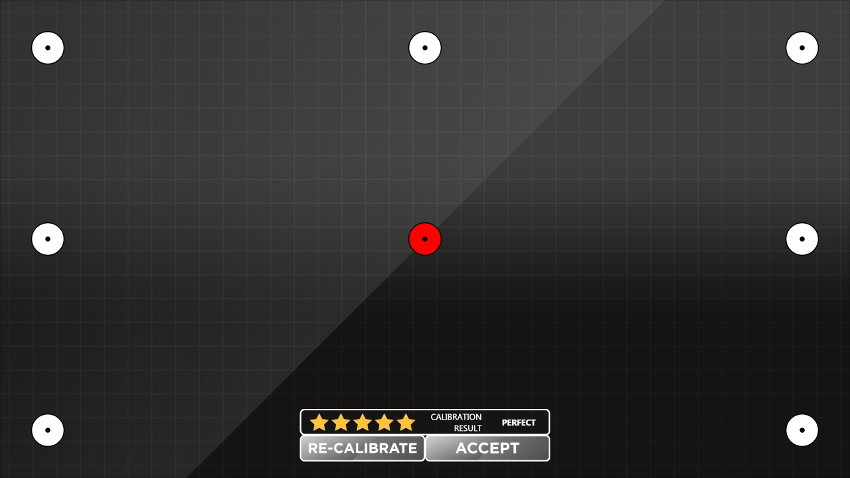
Figure: The EyeTribe UI evaluation window.
The action panel is located in the lower bottom of the evaluation window and consists of a rating control and two options to either re-calibrate in order to improve your calibration or accept your current calibration. The rating control provides a quantifiable measure of the current accuracy of your calibration. The five-star ratings and the corresponding messages are coupled in the following manner:
| Rating | Message | Description |
|---|---|---|
| ***** | Perfect | This is an optimal calibration result. No recalibration is needed. ( < 0.5°). |
| **** | Good | This calibration result is well-suited for eye eye tracking ( < 0.7°). |
| *** | Moderate | This calibration result is acceptable but you should try to improve your result with a re-calibration ( < 1°). |
| ** | Poor | This is not an optimal calibration result. You should try to improve your result by re-calibrating ( < 1.5°). |
| * | Re Calibrate | Your current calibration result is no good for eye tracking. Re-calibrate after verifying that you have good tracking. |
| Un Calibrated | You are not calibrated. If you see this after a calibration you need to restart EyeTribe UI. |
As stated earlier, the evaluation window appears after each completed calibration. If you want to disable this feature you can do so on the options tab. The UI will always show the latest calibration rating in the bottom-part of the trackbox in EyeTribe UI.
The Calibration tab allows users to control and change the properties of the calibration through the following options:
Are used to indicate the number of evenly distributed points displayed during the calibration routine. The panel allows you to choose between 9, 12 and 16 points. The default number of calibration points is 9 but it is not uncommon to increase the number for higher accuracy.
Allows you to select your preferred monitor under which you have placed your Eye Tribe Tracker. Any detected monitor is shown in the dropdown list with its device name and maximum resolution.
Shows the given width and height of the selected monitor in pixels. By specifying a lower width or height it is possible to run a calibration on a subsection of the screen, which may be helpful when using a large monitor.
Allows to place the reduced calibration area horizontally and vertically. Horizontal alignment allows you to align the reduced calibration area in the following manner: Left, Center and Right, while vertical alignment allows you to align the reduced calibration area in the following manner: Top, Center and Bottom. The Alignment controls are enabled when the default Calibration Area Size is modified.
The image below shows an example of a reduced calibration area placed on the active monitor with horizontal and vertical alignment. The horizontal and vertical alignment is set to Center and Bottom, respectively. The calibration targets will only appear in the limited window and you cannot expect good calibration results outside the calibrated area.
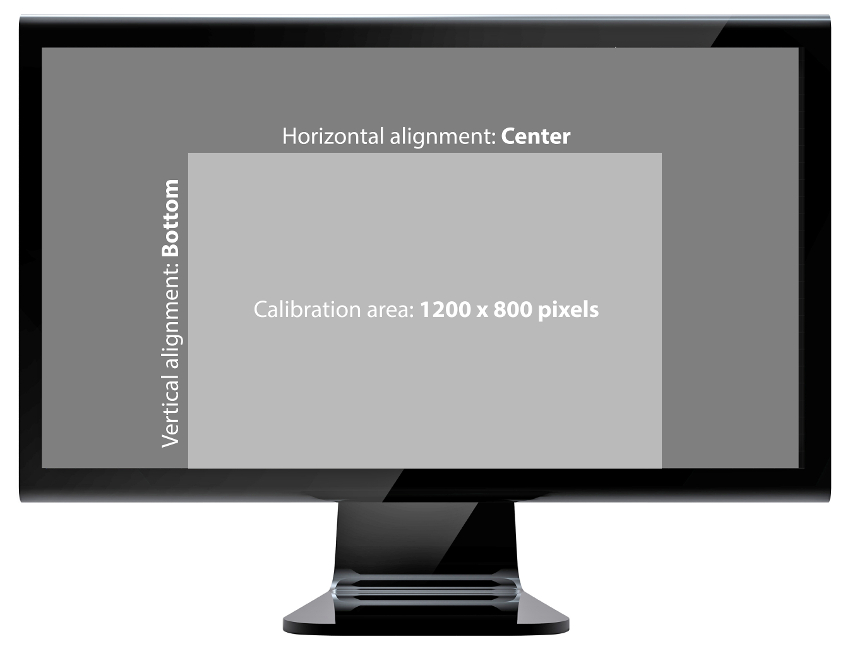
Figure: the image shows a reduced calibration area of 1200 x 800 pixels with horizontal alignment set to center and vertical alignment set to bottom.
The color selector allows you to change the background color and target color for your calibrations. The color selector allows you to configure an RGB value of your choice. The color selector is depicted in the image below.
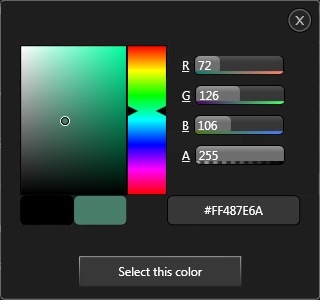
Figure: color selector in EyeTribe UI.
Allows you to change the display time for each target during the calibration process. For some users it helps to increase the sample time as it allows the user to fixate on the target. You can choose a display time between 500 ms (half a second) up to 2000 ms (two seconds). A good starting point for the point sample time is about 750 ms.
The options tab allows users to control the following features provided by EyeTribe UI.
The API Console is a tool that allows you to see and record the data received from the EyeTribe Server. For an in depth description of the frame object that contains gaze data, You can find out more about frame object under Category Tracker in the API Reference. Note that the server will only output gaze coordinates when a successful calibration has taken place.
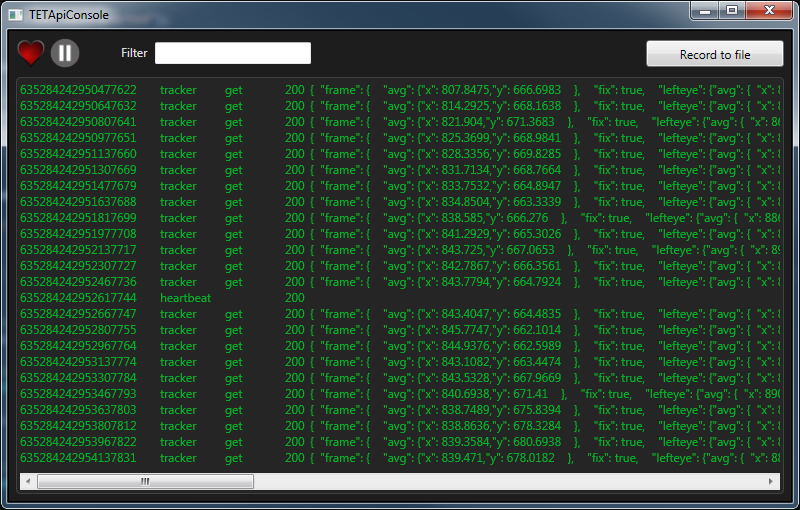
Figure: The API Console displays the data send from and to the Eye Tribe Server.
Pause and Play button respectively. If a certain packet type is of interest you may filter the results by entering a string in the textbox.If you wish to save the stream to file click the ‘Record to file’-button. After activating this feature the console output is paused and redirected to a text file.
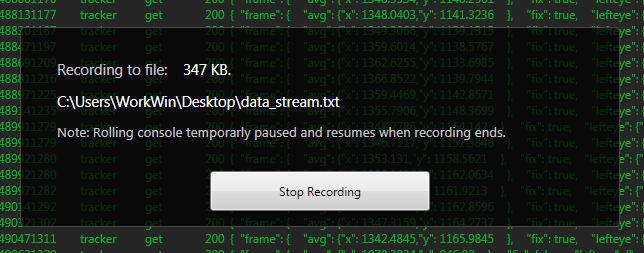
Figure: You can record the data to a text file if you are interested in offline data analysis.
If you issue a click on the Go button for the API help EyeTribe UI launches your default browser to the online documentation, which is located at http://dev.theeyetribe.com/general/. In the online documentation you can navigate to any section of your interest. EyeTribe UI will continue to run in the background even though it may be covered by the default browser’s window.
By default the software will start in demonstration mode unless you disable this feature. This checkbox allows you toggle this feature ON and OFF. The setting will be applied the next time EyeTribe UI is started.
Once the system has been calibrated the EyeTribe UI allows you to redirect mouse cursor to the gaze position. A panel with a stop icon will appear as seen in the image below.
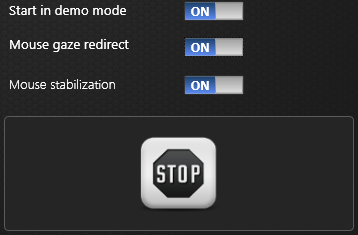
Figure: panel that indicates that mouse gaze redirection is enabled.
You can disable the mouse gaze redirection either by looking at the stop icon for half a second. If tracking is poor you can cover the sensor with your hand and manually click on the stop icon.
Mouse stabilization enables smoothing the gaze signal to reduce jitter, hence improving gaze control of a UI or the cursor.